
“What power and speed should I use for plywood?” is probably the question new laser owners ask most. You find a table online, copy the numbers – and your engraving comes out too pale, or your cut doesn’t go through.
That’s not your fault: those numbers were made on someone else’s machine. Here’s how to find your own settings with one small test.
Short answer: there’s no one right number – it depends on your laser, your focus and your sheet of plywood. The quick way to find yours: burn a small grid of squares, each with its own power and speed, on a scrap of the same plywood, and pick the square you like. My free Material Test makes that grid for you as a ready LightBurn file.
Why one table doesn’t fit everyone
Think of baking: the recipe says 350 °F (180 °C) for 25 minutes, but every oven is a little different, so you check the first tray. Lasers are the same. The right setting depends on:
- Your laser – diode or CO2, and how many watts it really has.
- Your focus – a beam slightly out of focus burns wider and weaker.
- Your plywood – the glue and wood inside change from brand to brand, even at the same thickness.
Burn one test grid instead
A material test is a small grid of squares. Each square gets its own power and speed – for example, power goes up from left to right and speed goes up from top to bottom. You burn it once on a scrap and simply look.
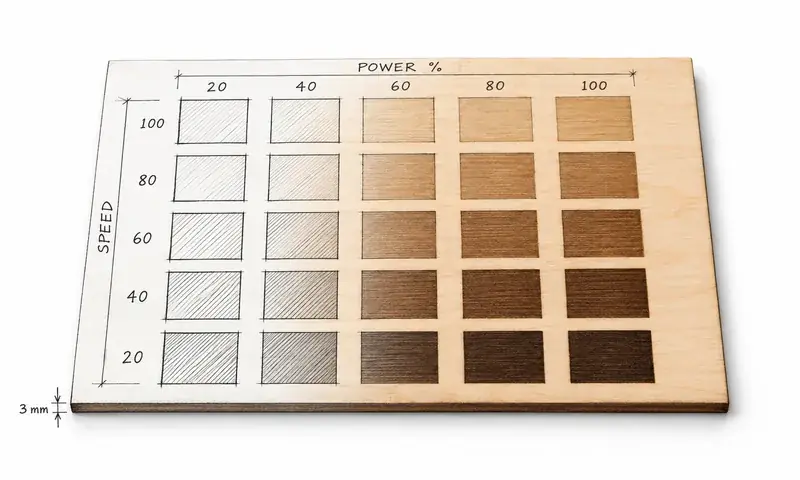
Want your own settings in one burn? Pick your laser, its power, the material and “engrave” or “cut” – the free Material Test gives you a grid with every square already set, plus labels burned on the scrap. No sign-up, no email.
How to run it
- Open the free Material Test, choose your laser type and power, the material, its thickness and Engrave or Cut.
- Download the LightBurn file and open it with File › Open (not Import) – every square already has its settings. For xTool or Glowforge, use the SVG and the color table.
- Focus first. A test burned out of focus gives wrong numbers for everything – my free Focus Test helps.
- Run it on a scrap of the same plywood you’ll use for the project.
How to pick the right square
- Engraving: even color, no black, smoky edges. Darker is not always better – it blurs small details.
- Cutting: the fastest square that drops out by itself. Then add a little power or one more pass as a safety margin.
- Not quite there? Click your best square in the tool and use Refine around this square for a tighter second grid.
Keep the scrap – the settings are burned right next to the grid, so it still makes sense in a month. And once your cuts go through cleanly, the next step for parts that fit together is measuring your kerf with the Kerf & Fit Test.
FAQ
Because it was made on someone else’s laser, with their focus and their plywood. It can be a starting point, but two lasers of the same model can burn differently. One test on your own scrap is faster than guessing.
Not for every sheet, but for every new brand or batch of plywood. The glue and the wood inside change from batch to batch, and so do the settings.
Use the same units as your laser software – many diode lasers show mm/min. 1 mm/s = 60 mm/min. You can switch the units in the tool’s Advanced settings.
Your laser, your numbers
Ten minutes and one scrap of plywood – and you have settings made for your machine, not someone else’s.
Happy cutting!
– Pavel